
There are many different ways to build your core fireteam, but in my own head I break them down into 3 different categories
Order Battery
Offensive Pain Train
Defensive Wall
Each of these have their uses and their roles in various sectorial and missions. Additionally you can tune away from their extremes to suit your style and mission as required.
Order Battery:
This style of fireteam focuses on mostly containing inexpensive line troop type models whose plan is to remain prone for most of the game and generate orders while protecting themselves with their bonus. Often this fireteam should at the very least pretend to have a LT in it if it doesn’t actually have one there. While you could have 5 line troops with combi rifles in a core team, I recommend spicing it up with at least one solid ARO piece like a missile or a sniper. Toss a paramedic in there to threaten to revive the missile or sniper, and maybe even a hacker to have six sense hacker to threaten stealth heavy infantry walking through repeaters, and you have a solid order battery with some defensive ARO power and utility in hacking. Here is a pretty notorious and powerful example from Varuna below:

The MSV 2 Multi sniper Kamau is really problematic for many armies to deal with, while the remaining fusiliers exist to provide inexpensive orders, protect your lt, and have some hacking utility. This fireteam really doesn’t want to move up the table as midfield fusiliers are not that powerful and extremely vulnerable. This can be done with less premier pieces as well, replacing the 32 point Kamau with a 15 point Fusilier Missile can be as problematic and force your opponent to risk very expensive pieces to deal with something really inexpensive.
Offensive Pain Train:
This Style of fireteam is meant to be used in the active turn, leveraging good gunfighters benefiting from powerful fireteam bonuses to overcome enemies with highly accurate high burst attacks. These fireteams should feature a weapon like a Spitfire or HMG to leverage all the burst you can with good range bands to overcome powerful defensive pieces. Additionally, as these firteams often want to move up the table, they should include specialists to help you achieve scenario pressure to ultimately win the game.
I will go over 3 examples of powerful aggressive fireteams.
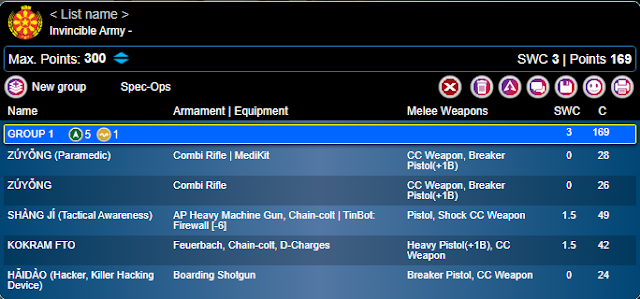
This fireteam leverages powerful heavy infantry with 3 different specialists to achieve different objectives, keep the fireteam up, and eliminate problem targets. The key attacking piece here is the SHang Ji, who adds order efficiency to the fireteam with tac awareness, a tinbot to protect the HI from hacking attacks and help the Hai Dao killer hacker fight enemy hackers, and an extremely dangerous AP HMG to mow down targets. The Zuyong paramedic effectively threatens to revive fallen members of the fireteam if your opponent doesn’t kill them completely. Kokram adds some long range utility alongside his engineering specialty and D-charges for objectives. The Haidao adds some hacking defense to the fireteam that pairs well with the aforementioned tinbot: Firewall. Overall, this fireteam can do most anything. Something else you may notice is this fireteam includes many template weapons. In ARO having 6 templates available can really dissuade the enemy from trying to target the fireteam up close. This fireteam would love to get positioned inside an armory and wait for the enemy to try and break in.
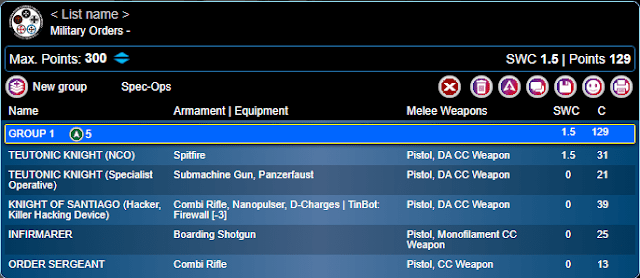
This example is a little more budget for similar capabilities. It has a Doctor, a spitfire for attacking, a Killer hacker with tinbot firewall, and plenty of templates for when things get up close and personal. This fireteam is a bit more vulnerable to hacking when compared to the Invincible Army Fireteam, and is a little less effective at cracking armor and long range by comparison, but saves some significant points in the process.
This is another version of an aggressive fireteam, but one that is very different from the first two. The first two I presented are filled with high durability heavy infantry, this a much squishier fireteam consisting of all 1 wound models, with the Deva having NWI (without shock immune). This fireteam is more on the spectrum of a defensive fireteam that can attack at range or midfield, but really does not want to close in like the first two fireteams as a template is the last thing they want to see. While it may look unassuming, the Dakini HMG can get marksmanship from an evo hacker to make it shooting on 17s against non-mimetism targets, while the Dakini itself has mimetism-3. This is more accurate than either the Teuton Spitfire or the Shiang Ji AP-HMG, and it has mimetism on top of that! Clearly this little bot can punch well above his 21 point cost when backed up by its fireteam.

All three of these fireteams are very powerful, but have some glaring weaknesses that can be exposed. Since they all want to activate and move around to attack enemies, they all expose themselves to the real danger of template weapons clipping multiple members of the fireteam. It may sound easy in your head to move up five 25mm bases up the table, but often you find some of them are left out in the open, or clumped up to try to stay safe as you move up a terrain dense table commonly found in infinity.
Make no mistake, if these fireteams get to deliver their skills on their terms, they will dominate most engagements they take and exert huge pressure on your opponent. These fireteams can win big, but they can also lose it all to a single missile they didn’t expect. These fireteams take a lot more skill and care to use and can very quickly go south when things start going wrong.
Defensive wall
This is a rarely used fireteam in N4. Orders are a premium, and leaving models standing is just asking for your own models to die. Be prepared in your planning for the game to lose any and all models standing in a defensive wall fireteam, but hope that they either waste significant orders in the process, or trade with much more expensive models.

USAriadna rocks this type of core team. The Grunt snipers provide high damage AP Sniper rifles at a budget price, alongside a bs13 missile on the minuteman. All of this is backed up by the fact that all of the models in the fireteam are armor 3 and relatively inexpensive. The paramedic is much more likely to have a chance to heal a friend in this team. What is interesting here is that you should never activate this team in a game, unless your opponent has very few models watching them. Leaving multiple members of a link team standing defensively means that when you activate them on your turn you give your opponent the option to shoot the non-link lead models, avoiding face to face rolls if you want to shoot back. While I think you shouldn’t think of this as a default core team to include in your sectorial, its one you should consider as a possibility at all times. It may look unassuming but on the table it can provide a massive road bump while it provides orders to some specialist models to use on the active turn.

So, to break down the styles
Order Battery:
Pros: Provides orders for the rest of your army, while protecting your LT or other squishy pieces. Can have some ARO or support functions like a hacker or missile.
Cons: Very low active turn potential. Hard to move up the table. Once the defensive ARO piece is removed, the fireteam will have very little impact on the game.
Offensive Pain Train:
Pros: Can move up the table aggressively and have a massive impact on the game, especially in active turn.
Cons: vulnerable in ARO due mostly to their exposed position. Weak members of the link can be picked off to reduce benefits of the fireteam. These teams tend to be massive points and SWC investments. These links are also extremely vulnerable to hidden missiles and rocket launchers that can drop templates on the team as they move up. While they often have better armor than normal, nobody wants to get hit by a dam14 AP Explosive missile really.
Defensive Wall:
Pros: Can provide powerful AROs to slow down your enemies turn and maybe even kill some models in the process. Can still protect LTs or other squishy support models.
Cons: Standing models will likely die, so don’t expect them to last long. Having multiple models standing limits your ability to activate them on your turn, your opponent gets the chance to ARO shoot the non link lead model and take down the capabilities of the defensive fireteam.
Core fireteams are extremely powerful tools that you should always consider taking if you are playing a sectorial. They provide many bonuses that can make your inexpensive models hit way harder than they should, or pump up elite units to insane levels. These powerful tools can change the dynamic of the game, and provide powerful solutions to the problems you face. Great care has to be taken with them though, as you can end up risking a huge part of your army. Lists should be built with the core fireteam in mind anytime you are in a sectorial.
